In past posts, we have seen how to provision and manage Cloud Spanner in production environments and how to use the Cloud Spanner Emulator in your development workflow with a sample Node.js app called OmegaTrade. We’ve covered:
-
The Cloud Spanner emulator’s various deployment models,
-
Running the emulator locally with OmegaTrade, and
-
Running the emulator remotely with OmegaTrade
In this post, we will cover how to use the Cloud Spanner emulator in your Continuous Integration and Continuous Delivery/Deployment (CI/CD) pipelines, with sample steps covering the following tools:
As a refresher, OmegaTrade is a stock ticker visualization application that stores stock prices in Cloud Spanner and renders visualizations using Google Charts. It consists of a frontend service that renders the visualizations and a backend service that writes to and reads from the Cloud Spanner instance.
For the sake of simplicity, we focus on the backend service of the OmegaTrade application in this blog post and demonstrate how to use the Cloud Spanner emulator in CI/CD pipelines for this service.
If you’d prefer to deploy the OmegaTrade backend manually, you can learn all about how to do that by reading this blog post and focusing on the section Manual deployment steps.
CI/CD Approach for deploying OmegaTrade
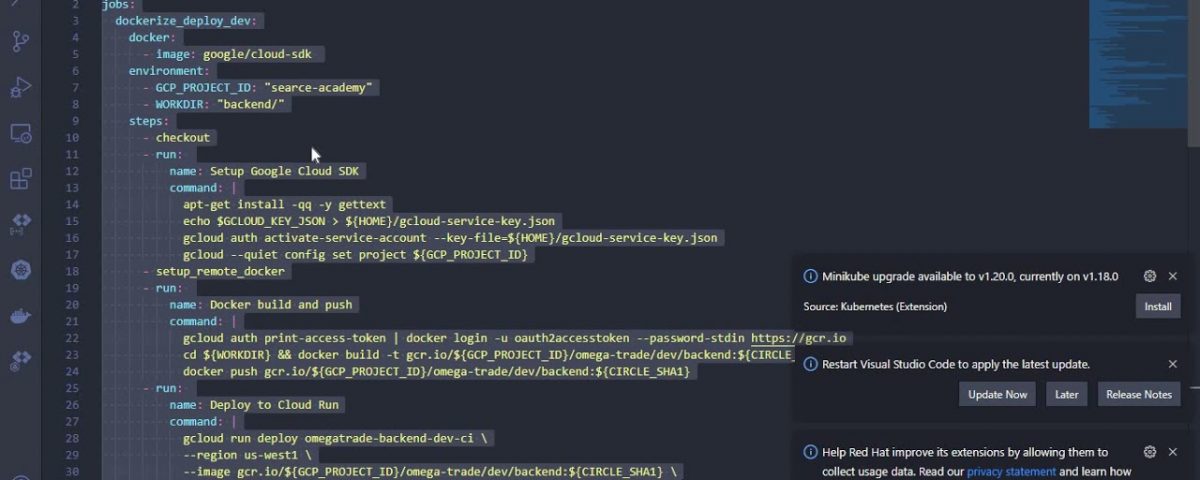
The steps for all of the CI/CD tools we discuss are similar. The code is stored in a public GitHub repository, Docker files are used for creating the application docker image, Google Container Registry is used as the docker image repository and gcloud commands are used for application deployment to Cloud Run.
Please note that all of the CI/CD tools require access to a GCP Service Account (SA) as well as integration with your GitHub repository.
The main branch keeps the application code to be deployed on the dev environment where we will be deploying the Cloud Spanner emulator. Since it is using the emulator, we are calling this a dev environment.
The prod branch keeps the application code to be deployed on the prod environment where we will be deploying an actual Cloud Spanner instance.
We have two dockerfiles, one for dev (dockerfile.local.emulator) where we will be deploying the Cloud Spanner emulator, and another for prod (dockerfile.prod). dockerfile.local.emulator contains the Cloud Spanner emulator as well as the application layers (for testing purposes) whereas dockerfile.prod only contains the application code layer.
Cloud Build
To set up CI/CD with Cloud Build, please ensure the Cloud Build API is enabled from your Cloud Console as a prerequisite. The first step is to connect our GitHub repository with Cloud Build for automated deployment of our application over Cloud Run.
From the Connect Repository option in the Cloud Build Triggers screen, select the source as GitHub (Cloud Build GitHub App), authenticate, select GitHub Account and Repository.
In the backend, Cloud Build will install the Cloud Build app in your GitHub repository. You can find Cloud Build in Repo Settings ? Integrations. This app will monitor your repository and trigger pipeline processing upon any commit or push to whichever branch you mention in the trigger. Cloud Build allows folder-specific triggers.
For this blog, we are going to create 2 triggers, one dedicated to dev deployment and another to prod. The Dev deployment will be communicating with the Spanner emulator whereas Prod one will be communicating with an actual Cloud Spanner instance.
Create Google Cloud Build Triggers
We are using the Cloud Build.yaml file (build config file) for the deployment. A build config file defines the fields that are needed for Cloud Build to perform your tasks. We can create either a .yml or .json file for Cloud Build where we write instructions for our CI/CD pipeline.
The Cloud Build config is purely parameterized which means we are using the same build config file for our frontend as well as backend deployment and providing values while creating triggers in the GCP UI.
The substitution_option: ‘ALLOW_LOOSE‘ allows Cloud Build triggers to run despite any missing substitution variable. We are using this option because we need some extra values for backend deployment. In this case, Cloud Build won’t return any errors.
To set up the backend trigger, follow the below steps:
-
From Cloud Build ? Create Trigger, enter a unique name, description for the trigger
-
Select Event as Push to a branch
-
Choose GitHub repo in Source
-
Enter ^main$ under Branch
-
Enter backend/** in the Included files filter (this option triggers a backend trigger when there is any change(s) in the folder)
-
Enter Cloud Build.yaml in Build Configuration.


