Imagine this scenario: Your company has been using Google Cloud for a little while now. Things are going pretty well—no outages, no security breaches, and no unexpected costs. You’ve just begun to feel comfortable when an email comes in from a developer. She noticed that the project she works on has a service account with a Project Owner role, even though this service account was created solely to access the Cloud Storage API. She’s uncomfortable with these elevated permissions, so you begin investigating.
As you dig deeper and start looking at a few projects in your organization, you notice multiple instances of high privileged access roles like Project Owner and Editor assigned to people, groups, and service accounts that don’t need them. The worst part is you don’t even know how big the problem is. There are hundreds of projects at your company and thousands of GCP identities. You can’t check them all manually because you don’t have time, and you don’t know what permissions each identity needs to do its job.
If any part of this scenario sounds familiar, that’s because it’s incredibly common. Managing identities and privileges is extremely challenging, even for the most sophisticated of organizations. There is good news though. Google Cloud’s IAM Recommender can help your security organization adhere to the principle of least privilege—the idea that a subject should only be given the access or privileges it needs to complete a task. As we discussed in this blog post, IAM Recommender uses machine learning to inspect every principal’s permission usage across your entire GCP environment for the last 90 days. Based on that scan, it either deems that a user has a role that is a good fit, or it recommends a new role that would be a better fit for that user’s needs. For example, suppose a senior manager uses Google Cloud to look at BigQuery reports. IAM Recommender notices that pattern and recommends changing the manager’s role from Owner to something more appropriate, like BigQuery Data Viewer.
In this blog, we’ll walk through one way to analyze IAM recommendations across all your projects and bulk-apply those recommendations for an entire project using a set of commands in Cloud Shell. With this process, we’ll show you how to:
-
View the total number of service accounts, members, and groups that have IAM Recommendations broken out by projects.
-
Identify a project with IAM recommendations that you feel comfortable applying.
-
Bulk-apply recommendations on that project.
-
(Optional) Revert the bulk-applied recommendations if you find that you need to.
-
Identify more projects with recommendations
-
Repeat steps 1-3.
Let’s get started.
Get ready to bulk-apply IAM Recommendations
Before you get started, there’s a bit of work that needs to be done to get your Google Cloud environment ready:
-
Make sure that the Recommender API and Cloud Asset API are enabled.
-
Create a Service Account and give it the IAM Recommender Admin, Role Viewer, Cloud Asset Viewer, Cloud Security Admin roles at the org level. You will need to reference this Service Account and its associated key later while running these scripts. Note that these scripts will not run if the Cloud Asset API of a project is in a VPC Service Control parameter.
Now you’re ready to start.
Step 1: View your IAM recommendations
1. Run this command in Cloud Shell to save all the required code in a folder named iam_recommender_at_scale. This command also creates a Python virtual environment within the folder to execute the code.
2. Go to the source directory and activate the python environment.
3. Next, retrieve all the IAM recommendations in your organization and break them out by project. Make sure to enter in your Organization ID, called out here as,”<YOUR-ORGANIZATION-ID>”. You’ll also need to include a path to the service account key you stored earlier in pre-step, called out below as, ”<SERVICE-ACCOUNT-FILE-PATH>”.
Here’s an example:
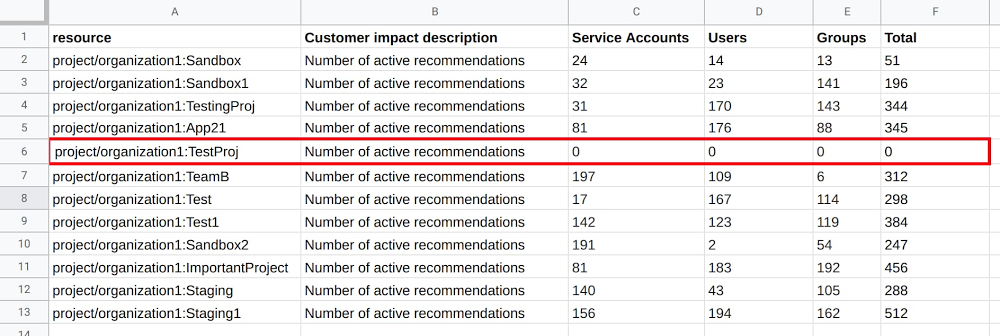
4. For this demo we exported the results from step 1.3 into a CSV and uploaded it into a Google Sheet. However, you could just as easily use something like BigQuery or your own data analytics tool to look at the data.

Table 1: The resource column lists the name of every project with active IAM recommendations within your organization. Subsequent columns break out the total number of recommendations by service account, users, and groups.
Step 2: Pick a project to apply IAM recommendations on
1. Analyze the output of the work you’ve done so far.

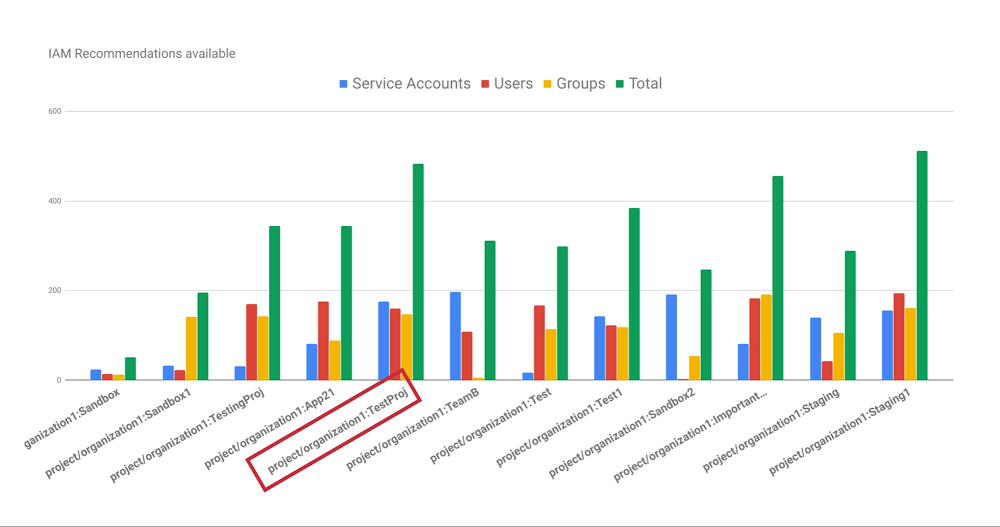
Table 2: When we visualize table 1 using a column chart, it becomes clear that there are a
couple of outliers in terms of the total number of recommendations. We will focus on the “project/organization1:TestProj” project for the duration of this document.
-
Does the project have a relatively high number of recommendations?
-
“TestProj” has the second highest total number of recommendations, so it qualified.
Is the project a safe environment on which to test-drive IAM Recommender?
-
Yes, because “TestProj” is a sandbox.
3. (Optional) If you don’t have a sandbox project, or the criteria we mentioned in step 2 don’t feel right, here are some other ideas:
-
Choose a project you are very familiar with. Something you would notice any unwanted changes on.
-
Ask a security-conscious colleague if they’d be willing to use IAM Recommender on their project.
-
Choose a legacy project with very predictable usage patterns. While IAM Recommender uses machine learning to make accurate recommendations for even the most dynamic of projects, this might be a more manageable risk.
Step 3: Apply the IAM recommendations
1. Surface each principal with a recommendation in “TestProj”. This step doesn’t apply the recommendations, only displays them.
For example:
2. The resulting JSON is the template for making actual changes to your IAM access policy. This JSON also serves as the mechanism to revert these changes should you find later that you need to, so make sure to store it somewhere safe.
Below is a generic example of a JSON. Each recommendation in the JSON contains:
-
id: a uniquely identifier for the recommendation
-
etag: the modification time of the recommendation.
-
member: the identity, or principal, that the recommendation is about. There can be more than one recommendation per member because a member can have more than one role.
-
roles_recommended_to_be_removed: the role(s) that IAM Recommender will remove.
-
roles_recommended_to_be_replaced_with: the role(s) that will replace the existing role. Depending on the recommendation, IAM Recommender replaces the existing role with one role, many roles, or no roles (i.e., removes that role altogether), with the goal of adhering to the principle of least privilege.
3. (Optional) This demonstration doesn’t alter the JSON, but rather applies all the recommendations as is. However, if you wanted to customize this JSON and get rid of certain recommendations, this is the time. Simply delete a recommendation with the editor of your choice, save the file, and upload it into the Cloud Shell file manager. You can even write a script that goes through the JSON and removes certain types of recommendations (e.g., maybe you don’t want to take recommendations associated with a certain principal or role).
4. Apply all the changes described in the JSON created in step 3.1 by executing the command below. Step 4 describes how you can revert these changes later if you want to.
Example:
5. Just like that, your project is far closer to adhering to the principle of least privilege than it was at the beginning of this process! When we run step 1.3 again we see that recommendations for “TestProj” went from 483 to 0.

Step 4: Revert the changes (optional)
Refer back to the JSON you created in 3.1. and run this code to revert the changes:
Example:
Step 5: Apply more recommendations
At this point, there are a couple options for what do do next:
You can start applying more recommendations! Run this script again or go to the IAM page in the Console and look for individual recommendations from the IAM Recommendation icon. Another option is go to the Recommendations Hub and look at all your GCP Recommendations, not just the IAM related ones.
Or, as a bonus step, you can set up an Infrastructure-as-Code pipeline for IAM Recommender, using something like Terraform. Check out this tutorial to learn how to set that up.
And that’s the least of it
There are many ways to use the IAM Recommender to ensure least privilege. We hope this blog has helped you identify and mitigate projects that could represent a security risk to your company. You can read about how companies like Veolia used the IAM Recommender to remove millions of permissions with no adverse effects. We are hopeful that your company will have a similar experience. Good luck and thanks for reading!
Special thanks to Googlers Asjad Nasir, Bakh Inamov, and Tom Nikl for their valuable contribution.


